To allow test-takers to choose their own testing time instead of adding them manually into certain testing sessions, the self-enrollment option must be enabled.
In this way, the test organization becomes automated and benefits candidates as they can book a test session based on the availability that suits them best.
However, it’s crucial to prevent candidates from seeing all tests if that’s not desired. This is where the test authorization feature comes in. This feature allows you to manually create authorizations for each candidate and grant them the freedom to book a session only for the tests they’re authorized to take.
This article will explain how to manually create test authorization within the YouTestMe system.
Creating test Authorization #
To create test authorization, navigate to Testing sessions and select Booking authorizations.
On this page, you can:
-
Create new – Create an authorization a candidate will require in order to book a testing session where authorization is required.
-
Filter or sort by the columns.
-
Edit authorization expiration time.
-
Clicking the Delete button will not delete the authorization, it will only deactivate it, and you will not be able to edit it, change the session or activate it.

After clicking the Create new authorization button, you should fill in the following fields in a pop-up window to create a new authorization:
-
External ID – For integration with external systems (optional).
-
Expiration time – Authorization validity time.
-
Assign candidate – Assign the authorization to the selected candidate. When you click on the Assign candidate button, a new dialog will pop up where you can select only one candidate, and you should click on Confirm button to assign the authorization.
-
Assign to test – Assign the authorization to the selected test. When you click the Assign to test button, a new dialog will appear where you can select only one candidate, and you should click the Confirm button to grant the authorization.
-
Click Create button to create the authorization.

Authorization status #
There are two possible statuses for authorizations:
- Active – An active test authorization means that it has been successfully created, and the candidate has not yet used it. This indicates that the candidate is authorized to take the test, but has not yet done so.
- Inactive – A test authorization becomes inactive under the following circumstances:
-
- If the manager manually deactivates it.
- If the candidate has already taken the test, which means the authorization has been used and cannot be reused.
- If the authorization has expired, which occurs when the candidate fails to take the exam within the deadline set by the manager.
Creating testing session #
When creating a testing session, you should enable the authorization required option. Additionally, if you want to allow candidates to book their test instead of adding them manually into the session, enable the self-enrollment option.

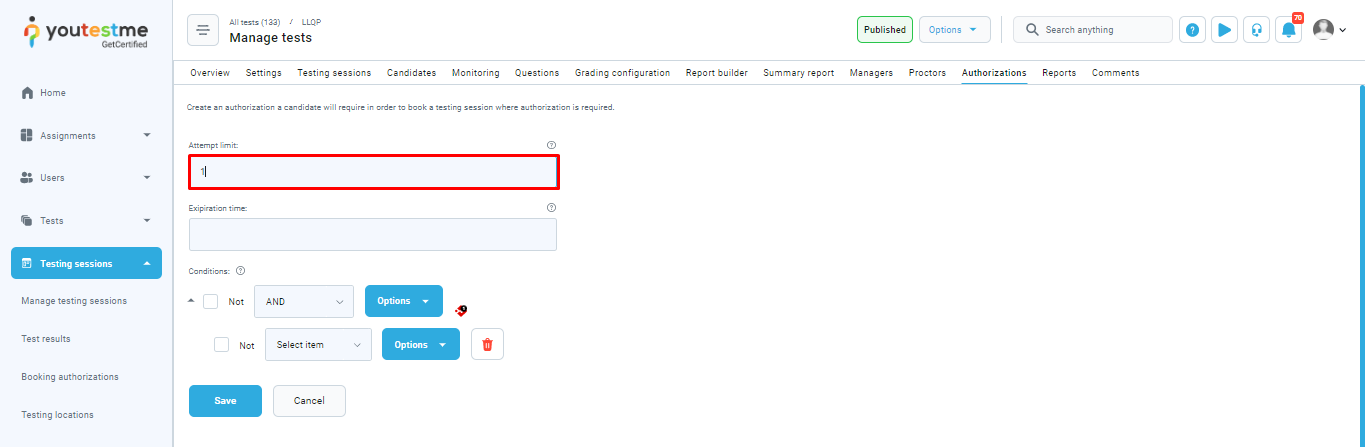
In the Authorization tab, you should set an authorization limit. The authorization limit is the number of test attempts a candidate is allowed to take using the same authorization.
Conclusion #
Enabling test authorizations within the YouTestMe system allows for secure and streamlined testing by ensuring that only authorized candidates can book testing sessions, thus preventing unauthorized access and maintaining the integrity of the testing process.
For more instructional materials on related topics, please read the following articles:
